Junk Sails
Updated 10-11-2019
--Building Minimus II
In spite of life getting in the way during the past
month, we did manage to get the 4 junk sails for Minimus II
sewn, the 4 masts stepped and the running rigging done. It appears that
the aluminum irrigation pipe masts will work well and I'll be posting a new page
with information on them in the next week or so.
Decades ago, Blondie Hasler commented on the "subtle complexity"
of the junk rig and he was quite right about that. There's a lot to take
into consideration when designing a junk sail. For guidance, I extensively
consulted the Practical Junk Rig by HG Hasler
and JK McLeod, Design and Build Your Own Junk Rig,
by Derek Van Loan and the Junk Rig
Association (JRA) website.
Junk sails can either be made flat, which is more
traditional, or cambered, which gives an airfoil shape for better windward
performance. When we were sailing
in the South Pacific a couple years ago, we met a New Zealander on a junk rigged
boat. For offshore sailing, he preferred the simplicity of a flat cut junk
sail, rather than one with cambered panels, and that's what we decided to go
with.
I experimented with several ideas I haven't seen
elsewhere, so those are mostly what I'm reporting on here. (We don't have
any connection with the businesses linked below, just found their prices and
service good.)
The sailcloth we used is WeatherMax 80, which is an 8 oz.
per square yard polyester awning material. We purchased it for around $7
per yard with free shipping on eBay, (Brokerman
200). The fabric was listed as 2nds, but we've found almost nothing in
the way of flaws. Several people on the Junk Rig Association website have
described Weathemax 80 as ideal for junk sails in most respects, but expressed frustration when
working with it due to its tendency to pucker along seams sewn parallel to the
warp (the length of the fabric).
Having worked in the sail making and marine canvas trade,
I hoped to bring a few tricks to bear in overcoming that issue. I think I
was successful, in that I found the fabric easy to work with. Several
tricks were especially helpful.
One is to pencil in all markings before sewing.
That includes seam overlaps, batten pocket placement, edge tabling, and anything
else that will be sewn. Once you start to sew, especially on seams running
parallel to the warp, the fabric begins to pucker, making accurate marking
difficult at that stage. In the finished sail, the puckering tends to
disappear as the sail is tensioned a bit by the weight of the battens, wind
pressure, etc.
Another trick is to use
3M Super
Seamstick basting tape. Standard seamstick tape tends to come unstuck
before the fabric gets to the machine, whereas Super Seamstick sticks to the
WeatherMax quite reliably.
The last tip is to make all fabric cuts with a hot
knife, not scissors. That seals the edge of the fabric, preventing
fraying.
Here are some
photos of the process.
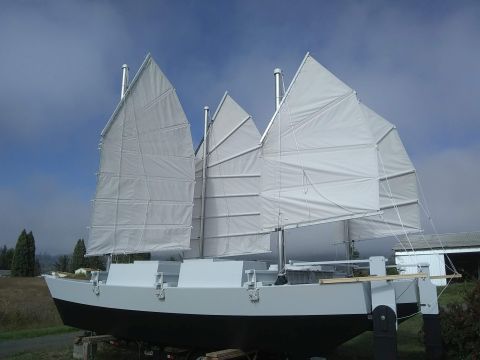
Sails up for the first time.
Ha, she looks like an armada!
The 2 mainsails are 91 square feet each and
the 2 mizzens 42 square feet each,
for a total of 266 square feet.
|

Phil Bolger once remarked on the "miles of cordage" a junk rig requires.
As usual, he was right. Fortunately, we found an online source of
U.S. made,
braided polyester rope
at bargain prices from the
Quality Nylon Rope Company.
Nice folks to deal with and
we've been impressed with the quality of the rope.
|
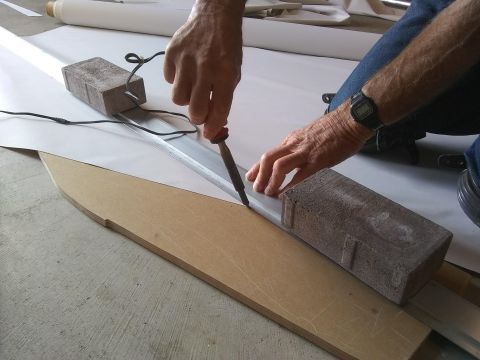
Cutting the sailcloth with a soldering iron, aluminum straight edge and
a piece of
MDO for a cutting board. It takes a bit of
practice, but makes a straight,
clean cut when you get the hang of it.
I prefer a simple soldering iron with a sharpened chisel tip rather than
a soldering gun.
The iron is always hot and stays the same temperature, which makes it
easier to do
a clean cut. A gun takes
a bit of time to heat up
and if you keep the trigger pressed,
gets progressively hotter, which
makes it harder to cut cleanly.
|
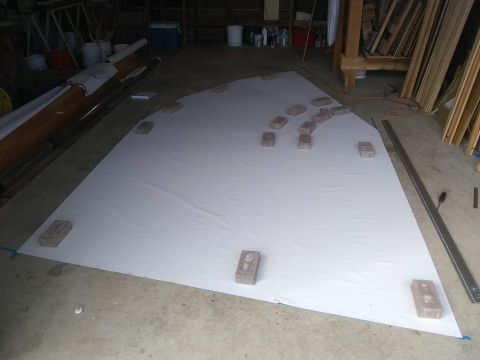
Before sewing, the WeatherMax 80 lies smooth and flat. |

At this stage it's easy to pencil in every mark on the sail, including
seam overlaps,
edge tabling, batten pocket locations, etc.
|

Taping seams with double sided basting tape. As noted above, 3M
Super Seamstick
works well with WeatherMax 80.
|

The reason for marking before sewing is that the fabric will pucker,
especially along the
warp, after it's sewn.
|

The puckers disappear when battens are installed and the sail is raised.
|

Leech end of batten, secured with a #10 stainless steel machine screw,
1" fender washers,
a #10 lock nut and 1" wide polyester webbing.
|

Backside of batten showing 1" fender washer and lock nut.
|

We passed the batten parrels through PEX tubing to reduce friction on
the mast.
To form the tubing, I inserted a spring into the PEX to help prevent it
from kinking, then
heated the PEX with a propane torch until it bent easily to the
desired shape. Dunking it in a basin of cold water
to cool locked in the shape.
|
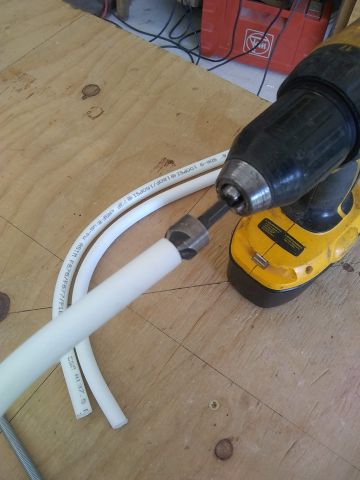
A deburring tool chamfers the end of the tubing.
|
| |