
The local irrigation supply yard.

One of our finished main masts, showing triple wall thickness at mast step.
The following photos show how we did it.
(The black ABS pipe is just an exterior sleeve to help distribute lateral loads at
the mast step.)

A line is scribed the length of the piece to be used as an internal sleeve.
The weld gives a straight reference line. Penciling over the weld line makes it
easier to see.

A straight edge is used to connect the pencil lines.

A sewing tape is used to measure where a second line will be drawn, parallel to the first one.
The formula we used to calculate where the second line will go is:
circumference of sleeve =
[(outside diameter of pipe minus 2 times the wall thickness) times pi] minus 6mm
For example, here's the calculation for our sleeve circumference:
[(102mm OD pipe minus 2 x 1.83mm) x 3.14] minus 6mm
= [(102 minus 3.7) x 3.14] minus 6
= [98.3 x 3.14] minus 6
= 309 minus 6
=303mm
The 6mm allowance insures that the sleeve will not be too large to fit inside the mast.
Without that margin, the sleeve could jam inside the mast.
If making a triple wall section, where a second sleeve will be pressed inside
the first one, adjust the formula accordingly. The second sleeve goes in
after the first one is all the way in.

A circular saw makes quick work of cutting along the lines. A piece of 2" x 4"
board screwed to the bottom of the saw base helps to guide the cuts.
Eye and ear protection are a must. An ordinary wood cutting
blade works well, but not a plywood blade, as the spaces between the
small teeth tend to fill with aluminum.

A right angle grinder with a metal grinding wheel turned upside down works well
for removing burrs. Caution is advised with the blade guard off.
The inside and outside edges of the cuts should be free of burrs. A final smoothing
with a hand file is recommended.

A toilet brush is taped to a long pole and covered with grease to coat the inside of the
mast.

3 hose clamps are used to compress the sleeve. The compressed sleeve isn't perfectly circular,
so a bar clamp is used to make it circular long enough to insert the end of the sleeve into
the mast.

The bar clamp is then removed and the hose clamps slid back so a portion of the sleeve can be
coated with grease. The hose clamps are then put back on, as in the previous photo.

Gentle taps with a sledge hammer easily drives the sleeve into the mast for the first
few feet (1m) or so. Note the board to protect the end of the sleeve while tapping.
Each time the sleeve is driven in until a hose clamp is reached, the 3 clamps are moved back
6" (150mm) or so along the sleeve and a new section is greased.
After the first few feet are tapped in, it's time to switch to a hydraulic jack.

The mast is then positioned between two immovable objects. In our case, that
was two walls of the shop. A hydraulic jack then drives the sleeve the rest of the
way into the mast. As the sleeve goes in, the hose clamp and greasing routine is repeated
each time the jack reaches maximum extension. More and more blocks are
added behind the jack as the sleeve goes in. It's important to make sure the
mast, sleeve, jack and blocks all remain inline with each other.
If we hadn't had two walls at the right distance apart, our plan was to park two vehicles
parallel to each other and the appropriate distance apart, then brace the jack, mast
and sleeve against the wheels.
A shipwright friend of ours suggested the hydraulic jack idea--thanks Drew!
He also suggested that one might use a couple thick boards connected by two long pieces
of chain as braces for the jacking operation.

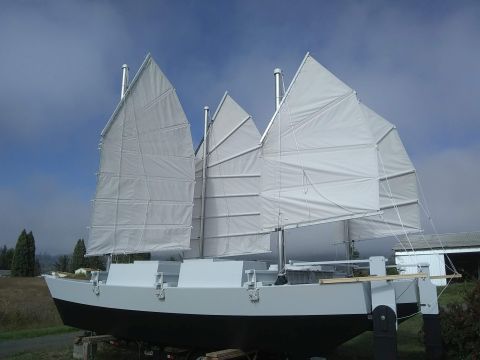
All 4 masts finished except for masthead fittings.
The black collars are ABS pipe pressed over the mast to help distribute lateral loads
at the mast step and deck collar. The green objects inside the masts are pool noodles to give
buoyancy in case a mast ever goes overboard.
We'll be reporting on how they do during sea trials next spring.

Our mast head fittings are made from a 4" (102mm) PVC cap.
One of the dyneema lines is for the halyard block and the other is to anchor
the topping lifts and mast lift. The lines are free to rotate around the mast
as the sail angle changes.
We used dyneema because the masthead gets lots of sun exposure
and dyneema is highly UV resistant.

Masthead fitting on mast. A piece of 4" (102mm) Schedule 40 PVC or ABS pipe several inches
long is pressed over the end of the 4" aluminum irrigation pipe mast,
then the 4" PVC pipe cap is pressed over the plastic pipe.
This makes a secure and weather tight fit.

A close-up of the parts making up the top of the mast head fitting.
We got all the parts at the local hardware store. Here's the parts
list in case anyone wants to try it.
--Schedule 40 PVC slip cap, 4" (Spears brand is a nice, rounded shape)
--stainless machine bolt, 1/4" x 1-3/4"
--stainless fender washer,1/4" x 1-1/2"
--2 nylon bushings, 5/8" OD x 1/4" ID x 3/8" long
--aluminum tube, 13/16" OD x 5/8" ID x 7/8" long
--1/4" x 1" stainless fender washer
1/4" stainless lock nut
I filed down the raised lettering on top of the cap so it wouldn't
abrade the dyneema lines.
All four masts stepped.